Serious home cooks know that a powerful range hood isn’t optional, it’s essential. When you’re running high-BTU burners or searing steaks on a professional-style range, a residential hood often can’t keep up with the heat, smoke, and grease. That’s where commercial-grade ventilation comes in. A commercial range hood for home use offers the airflow and durability that match high-output cooking, but installing one requires more than just swapping units. From CFM ratings to ductwork requirements and local codes, there’s real planning involved. This guide walks through what makes commercial hoods different, how to size them correctly, and whether your kitchen can handle the upgrade.
Table of Contents
ToggleKey Takeaways
- A commercial range hood is essential for homes with professional-style gas ranges over 15,000 BTU, offering 900–2,000 CFM airflow compared to residential hoods’ 300–600 CFM.
- Commercial range hoods use heavier 18–20 gauge stainless steel, durable baffle filters, and are built for continuous operation, lasting significantly longer than residential models.
- Calculate CFM requirements using 100 CFM per 10,000 BTU for gas ranges, then account for duct losses (5% per 10 feet, 25 CFM per 90-degree elbow) to avoid undersizing.
- Most jurisdictions require permits and makeup air systems when hood exhaust exceeds 400 CFM to prevent negative pressure and dangerous backdrafting of furnaces or water heaters.
- Plan for professional installation costs of $500–$1,500 and ongoing maintenance including monthly filter cleaning and annual ductwork inspections at $200–$400 per cleaning.
- Wall-mounted canopy hoods are the most practical choice for home kitchens, while island hoods need 50% higher CFM and more complex ceiling-through-roof ductwork.
What Is a Commercial Range Hood and Why Consider One for Your Home?
A commercial range hood is a heavy-duty ventilation system designed to handle the intense heat, grease, and smoke produced in restaurant kitchens. Unlike typical residential hoods that move 300–600 cubic feet per minute (CFM), commercial units often start at 900 CFM and can exceed 2,000 CFM for large installations.
Homeowners consider commercial-grade hoods for a few key reasons. First, if they’ve installed a professional-style gas range with 15,000+ BTU burners, the ventilation needs increase dramatically. Standard hoods can’t evacuate heat and combustion byproducts fast enough. Second, anyone who cooks frequently, especially with high-heat techniques like wok cooking or grilling, benefits from the superior capture area and airflow. Third, commercial hoods are built with heavier-gauge stainless steel and designed for continuous operation, meaning they’ll outlast most residential models.
Safety note: Gas ranges produce carbon monoxide, nitrogen dioxide, and particulate matter. Adequate ventilation isn’t just about odor control: it’s about indoor air quality. Homes with commercial-style cooking equipment should pair them with ventilation that meets or exceeds the manufacturer’s requirements.
That said, commercial range hoods aren’t plug-and-play. They require larger ductwork (often 8–10 inches in diameter), makeup air systems in many jurisdictions, and electrical circuits that can handle higher amperage blower motors. They’re also louder, expect 6–9 sones at full speed versus 3–5 for residential units.
Key Differences Between Commercial and Residential Range Hoods
Understanding what separates commercial from residential hoods helps homeowners decide whether the upgrade is worth the investment and complexity.
Airflow capacity (CFM): Residential hoods typically max out around 600 CFM. Commercial units start higher and scale up based on burner output. A general rule: you need 100 CFM per 10,000 BTU for gas ranges, but commercial hoods often exceed this to handle grease-laden vapor.
Construction materials: Commercial hoods use 18- to 20-gauge stainless steel throughout, including baffles and ductwork connections. Residential models often use lighter-gauge steel or aluminum with painted finishes that won’t hold up under constant grease exposure.
Filtration system: Commercial hoods rely on baffle filters, stainless steel panels with angled channels that trap grease through directional changes and condensation. They’re dishwasher-safe and far more durable than the mesh or charcoal filters in residential hoods. Baffle filters also improve fire safety by containing grease and preventing buildup in ducts.
Noise levels: Higher CFM means louder operation. Commercial blowers generate 7–9 sones at full blast, compared to 3–5 for residential hoods. Some homeowners install remote or inline blowers in attics or exterior walls to reduce kitchen noise, though this adds cost and complexity.
Ductwork and makeup air: Commercial hoods exhaust large volumes of air. In tightly sealed modern homes, this creates negative pressure, which can backdraft furnaces, water heaters, or fireplaces, pulling combustion gases into living spaces. Many building codes now require makeup air systems (fresh air intakes) when exhaust exceeds 400 CFM. Expect to add a ducted intake with a motorized damper, often controlled by the hood itself.
Code and permitting: Installing a commercial hood almost always requires permits. Inspectors will check duct size, clearance to combustibles, electrical capacity, and makeup air provision. Some jurisdictions classify high-CFM hoods as commercial equipment, triggering additional fire suppression or grease trap requirements.
Types of Commercial Range Hoods for Home Kitchens
Commercial hoods come in several configurations. Choosing the right type depends on your range location, ceiling height, and kitchen layout.
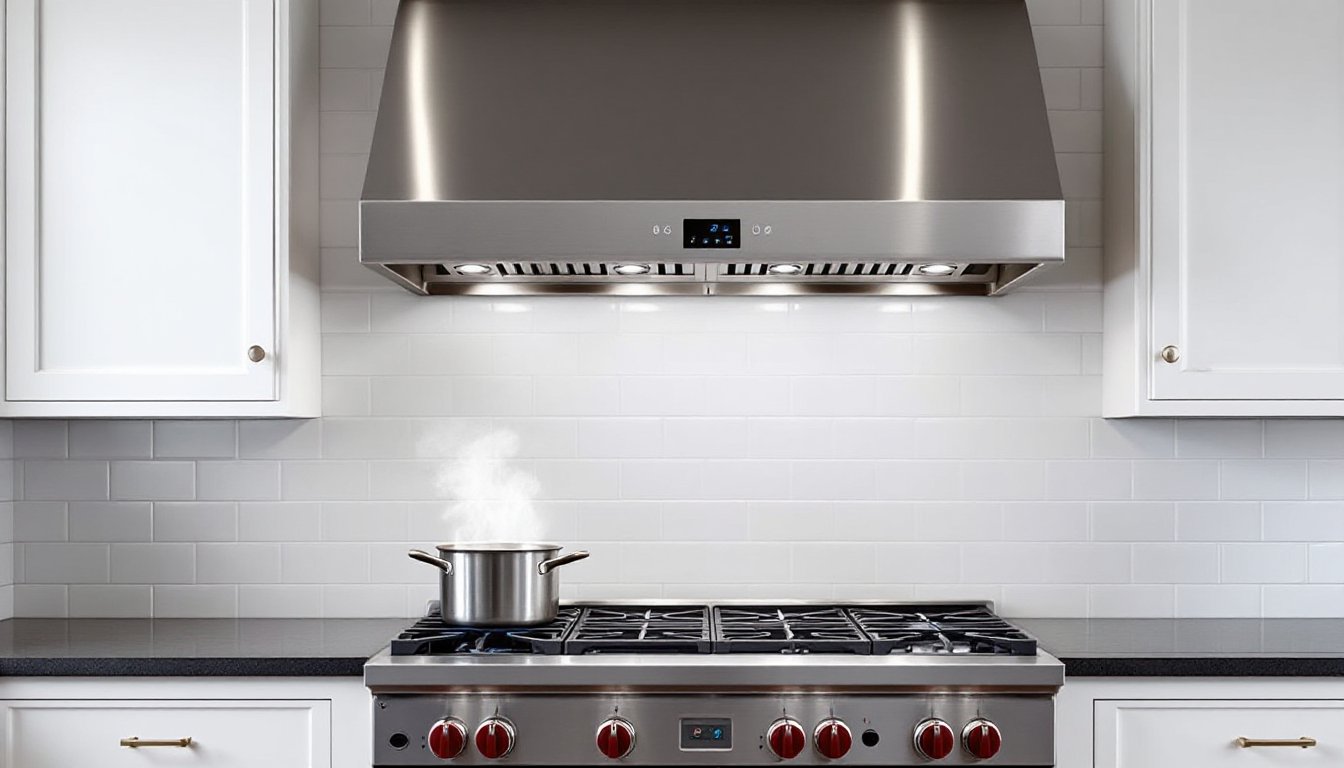
Wall-Mounted Canopy Hoods
These are the workhorses of commercial kitchens and the most common choice for home installations. A wall-mounted canopy hood sits against the wall above a range, with a deep capture area (usually 24–30 inches) that extends over the cooktop.
Pros: Maximum grease capture, easy duct routing straight up or through the wall, and compatibility with most kitchen layouts. They’re also easier to install than island hoods because you can anchor to wall studs.
Installation notes: Mount the hood 30–36 inches above the cooktop surface for gas ranges (check manufacturer specs, some high-BTU units require 36 inches minimum). Secure to wall studs using 1/4-inch lag bolts, not drywall anchors. The hood itself can weigh 60–100 pounds, and vibration from the blower will loosen inadequate fasteners over time.
If routing duct through an exterior wall, use rigid metal duct (never flexible aluminum) and minimize elbows, each 90-degree turn reduces airflow by roughly 25 CFM. Seal all duct joints with high-temperature foil tape, not duct tape, and insulate duct runs through unconditioned spaces to prevent condensation.
Island Range Hoods
Island hoods mount to the ceiling above freestanding ranges or cooktops. They require ceiling joists strong enough to support the weight plus vibration dampening.
Pros: Dramatic visual statement, 360-degree access to the cooktop, and effective ventilation when sized correctly.
Cons: Ductwork runs vertically through the ceiling, which complicates installation if you’re working around floor joists, HVAC ducts, or plumbing. Island hoods also need higher CFM ratings, about 50% more than wall-mounted units, because they lack a rear wall to help contain rising heat and smoke.
Installation notes: Locate ceiling joists and install a support frame using 2×6 or 2×8 blocking between joists. The hood must be rock-solid: any movement will create noise and loosen connections. Run duct straight up through the attic and out through the roof with a weather cap and flashing. Roof penetrations are common leak points, so use quality flashing and seal with roofing cement.
Ceiling height matters. If your ceiling is over 9 feet, you may need a chimney extension to close the gap between the hood and ceiling. Most manufacturers sell extensions in 6- or 12-inch increments.
How to Choose the Right Size and CFM Rating
Undersizing a commercial hood is the most common mistake. Here’s how to calculate what you actually need.
Step 1: Measure your cooktop. The hood should overhang the cooking surface by at least 3 inches on each side. For a 36-inch range, that means a minimum 42-inch hood. If you’re installing over an island, add 6 inches per side (a 36-inch range needs a 48-inch island hood).
Step 2: Calculate required CFM. For gas ranges, use this baseline: 100 CFM per 10,000 BTU. Add up the maximum BTU output of all burners. For example, a professional-style range with six burners totaling 90,000 BTU needs 900 CFM minimum. Some manufacturers recommend 150 CFM per 10,000 BTU for commercial-style equipment, check the range installation manual.
Electric and induction cooktops generate less airborne contamination. A general guideline is 100 CFM per linear foot of cooktop, so a 36-inch (3-foot) electric range needs at least 300 CFM. But, if you sear, grill, or use a griddle, bump it to match gas range standards.
Step 3: Account for duct losses. Long duct runs, elbows, and roof caps all reduce effective CFM. For every 10 feet of straight duct, lose about 5% airflow. Each 90-degree elbow costs roughly 25 CFM. If your hood rates at 1,000 CFM but you have 20 feet of duct with two elbows, your actual performance drops to around 850 CFM. Size up to compensate, or simplify the duct path.
Step 4: Consider noise. Running a 1,200 CFM hood at full blast is loud, often louder than a vacuum cleaner. Many commercial hoods offer variable-speed controls so you can dial back airflow during low-heat cooking. Alternatively, install a remote blower in the attic or outside. This pushes noise away from the kitchen but requires professional installation and adds $400–$800 to the project.
Pro tip: Don’t rely solely on manufacturer CFM ratings. Look for hoods tested to HVI (Home Ventilating Institute) standards, which provide verified airflow, noise, and efficiency data.
Installation Considerations and Requirements
Installing a commercial range hood isn’t a weekend DIY project for most homeowners. Here’s what to expect.
Permits and inspections: Almost every jurisdiction requires permits for range hood installations exceeding 400 CFM or involving new duct penetrations. Inspectors will verify duct size, clearances, electrical work, and makeup air. Skipping permits can void homeowner’s insurance and complicate future home sales.
Makeup air systems: When a hood exhausts more than 400 CFM, many codes mandate a makeup air system to replace expelled air and prevent negative pressure. These systems pull fresh outdoor air into the home, often through a motorized damper that opens when the hood runs. Costs range from $800 for a basic passive system to $2,500+ for a ducted, conditioned air unit. Cold-climate homeowners should budget for a model with a heating element to temper incoming air.
Electrical requirements: Commercial hoods draw 5–10 amps. You’ll likely need a dedicated 120V circuit on a 15- or 20-amp breaker. If you’re adding a remote blower, expect another circuit. Hire a licensed electrician, this isn’t the place to guess wire sizing or breaker capacity.
Ductwork: Use rigid metal duct (galvanized steel or stainless) sized to match the hood’s outlet, usually 8, 10, or 12 inches in diameter. Never use flex duct for the main run: it restricts airflow and collects grease. Support ducts every 4 feet with metal strapping and seal joints with aluminum foil tape rated for 250°F+. Check the best gas ranges for compatibility with high-CFM hoods.
Clearance to combustibles: Maintain at least 18 inches between the bottom of the hood and a gas cooktop (24 inches for extra-high BTU burners). The sides of the hood must clear cabinets, walls, and trim by distances specified in the installation manual, usually 3–6 inches.
Professional vs. DIY: If you’re comfortable working with ductwork, electrical boxes, and structural fasteners, you can handle the physical installation. But plan on hiring pros for electrical hookup, makeup air integration, and final inspection. Budget $500–$1,500 for labor, depending on complexity.
Ongoing maintenance: Clean baffle filters monthly in a dishwasher or with a degreaser soak. Inspect ductwork annually for grease buildup, commercial kitchens have duct fires, and so can homes. Some jurisdictions require annual professional duct cleaning for high-CFM systems. Budget $200–$400 per cleaning.