If you’re looking to maximize kitchen space without sacrificing cold storage, a low boy refrigerator might be the solution you didn’t know you needed. These compact under-counter units pack full-size cooling power into a footprint that fits beneath standard countertops, making them ideal for tight kitchens, outdoor bars, home offices, or secondary prep areas. Unlike cramming a mini-fridge into a corner or sacrificing cabinet space, a low boy offers professional-grade refrigeration designed specifically for built-in installations. This guide walks through what sets these refrigerators apart, where they work best, and how to choose and install one correctly.
Table of Contents
ToggleKey Takeaways
- A low boy refrigerator maximizes space efficiency by fitting beneath standard countertops with full-size cooling power, making it ideal for tight kitchens, bars, and secondary storage without sacrificing functionality.
- Low boy refrigerators feature front-venting systems and commercial-grade construction for zero-clearance installation, unlike standard models, and maintain food-safe temperatures of 34–38°F with better ergonomic accessibility.
- Energy costs are significantly lower than full-size units, consuming 150–250 kWh annually versus 400–600 kWh for standard refrigerators, with ENERGY STAR certification providing 15–30% additional savings.
- Key features to prioritize include digital thermostats for precise temperature control, adjustable shelving for air circulation, storage capacity between 2.5–6.0 cubic feet based on actual needs, and noise ratings below 40 decibels for quiet spaces.
- Proper installation requires measuring ventilation clearances (1–2 inches above and 1 inch behind), verifying 115V/15A electrical supply, leveling the unit, and allowing 4–6 hours settling time before powering on.
- Low boy refrigerators integrate seamlessly into kitchen islands, home bars, outdoor kitchens (with weather-resistant models), home offices, and guest suites, offering design flexibility and zoned storage without the high cost of full-size integrated appliances.
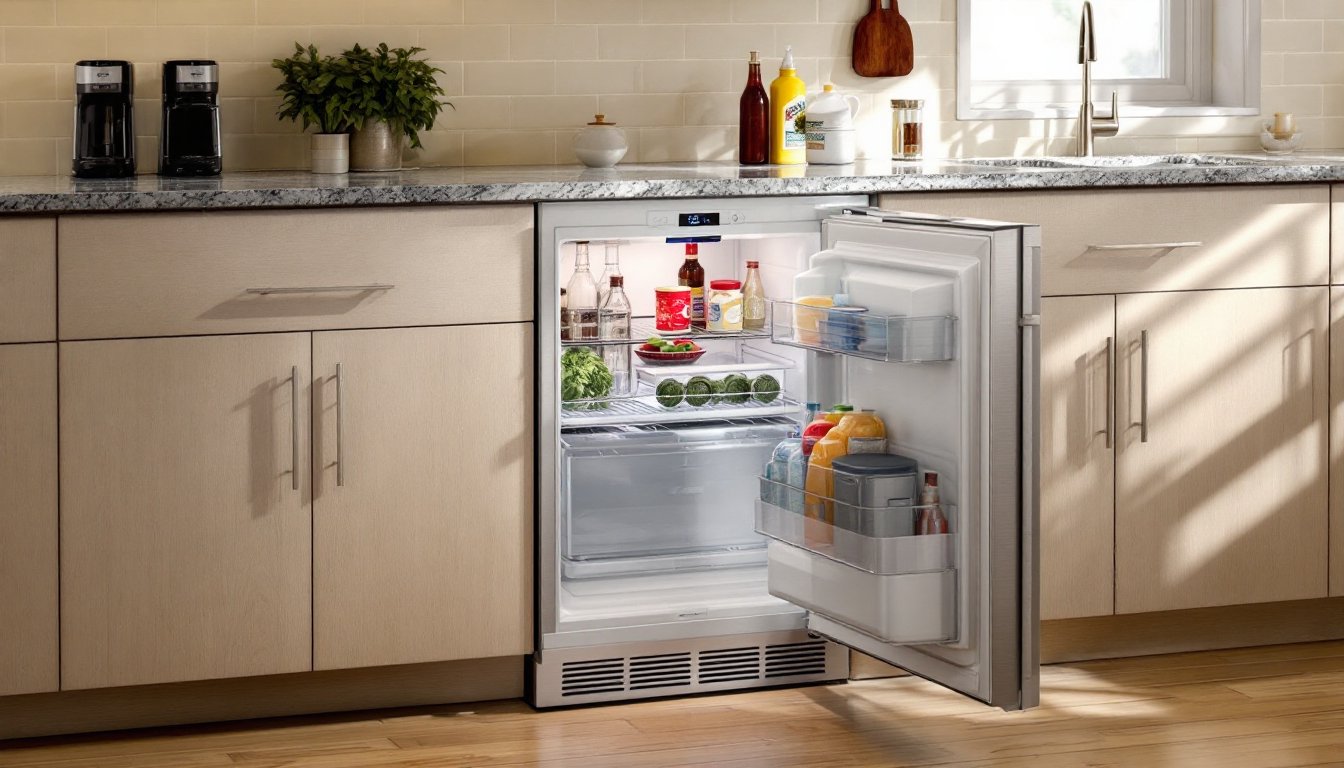
What Is a Low Boy Refrigerator and How Does It Differ from Standard Models?
A low boy refrigerator is a compact, under-counter cooling unit typically measuring 24–36 inches in height, designed to fit beneath standard kitchen countertops (usually 36 inches high) or bar-height surfaces. Unlike standard full-size refrigerators that stand 65–70 inches tall, low boy models prioritize horizontal storage over vertical reach.
The key difference lies in design intent. Standard refrigerators are freestanding appliances meant to dominate a kitchen footprint. Low boys are built for integration, they slide into cabinetry, tuck under islands, or nestle into outdoor kitchens. Most feature front-venting systems, which exhaust heat through the toe kick rather than out the back, allowing zero-clearance installation against walls or inside cabinets. This is critical: a rear-venting unit will overheat and fail if you box it in.
Construction also differs. Low boy refrigerators often use commercial-grade compressors and stainless-steel interiors to handle high-traffic environments like wet bars or workshop spaces where a standard fridge would struggle. They’re engineered for accessibility, pull-out drawers, reversible doors, and adjustable shelving make reaching items easier than crouching into a mini-fridge.
Don’t confuse a low boy with a beverage cooler or wine fridge. While those prioritize bottles and cans, low boy refrigerators maintain 34–38°F temps suitable for perishable food, leftovers, and produce. Some models include small freezer compartments, but most dedicate all space to refrigeration.
Key Benefits of Installing a Low Boy Refrigerator in Your Home
Space efficiency tops the list. In galley kitchens or condos where every square foot matters, a low boy frees up vertical space for cabinets while keeping essentials cold. You’re trading height for accessibility, no more digging through a deep freezer or losing groceries in the back of a standard fridge.
They excel as secondary refrigeration. Place one near the grill for drinks and condiments, in a home office for lunch storage, or in a finished basement for overflow during holidays. Experts at The Kitchn frequently recommend under-counter solutions for kitchens that need zoned storage without adding bulk.
Ergonomics matter more than most homeowners realize. Bending to access a low boy feels more natural than stooping into a bottom freezer drawer or reaching overhead into a top-mount fridge. For aging-in-place renovations or accessible design, counter-height refrigeration reduces strain.
Energy costs often surprise people. Smaller interior volumes require less power to cool, and modern low boy models typically draw 150–250 kWh annually compared to 400–600 kWh for full-size units. That’s real money over a 10–15 year lifespan, especially if you’re running it as a secondary unit.
Finally, they integrate cleanly into custom cabinetry. Panel-ready models accept cabinet fronts that match your kitchen, creating a seamless built-in look without the $8,000+ price tag of a full-size integrated refrigerator. If you’re renovating or building, low boys offer design flexibility that standard appliances can’t match.
Top Features to Look for When Buying a Low Boy Refrigerator
Not all under-counter refrigerators are created equal. Focus on these features before committing.
Energy Efficiency and Temperature Control
Look for ENERGY STAR certification as a baseline, it ensures the unit meets EPA efficiency standards and typically saves 15–30% on operating costs. Check the yellow EnergyGuide label for estimated annual kWh: anything under 200 kWh is excellent for a low boy.
Digital thermostats beat analog dial controls every time. They maintain tighter temperature ranges (±1°F versus ±3°F), which matters for food safety and longevity. Some models include dual-zone cooling if you want one section colder for beverages and another for produce.
Pay attention to defrost systems. Auto-defrost (also called frost-free) prevents ice buildup but runs the compressor more often, using slightly more energy. Manual defrost is more efficient but requires you to shut down and drain the unit every few months, annoying if you’re using it daily.
Compressor location matters for longevity. Units with compressors mounted on vibration-dampening pads run quieter and last longer. If you’re installing in a quiet space like a home office or bedroom suite, seek models rated below 40 decibels.
Storage Capacity and Interior Configuration
Low boy refrigerators range from 2.5 to 6.0 cubic feet. A 2.5 cu. ft. model holds roughly 24 cans plus some food: 6.0 cu. ft. can store a week’s worth of groceries for two people. Measure your actual needs, oversizing wastes energy and undersizing forces you to cram items in, blocking airflow and reducing efficiency.
Adjustable shelving is non-negotiable. Wire shelves allow better air circulation than solid glass, but glass shelves contain spills. Removable shelves let you fit tall bottles or platters. Check shelf weight ratings if you plan to store heavy items like gallon jugs.
Door storage varies wildly. Some low boys have deep door bins that swallow condiment bottles: others have shallow lips that barely hold a stick of butter. If you’re replacing a mini-fridge, you’ll be shocked how much more usable space a well-designed low boy offers.
Drawer-style models versus door-swing units change the game for island or peninsula installations. Drawers pull out like a file cabinet, making every item visible from above, great for kids or anyone with mobility issues. Swing doors require clearance space, but they typically offer more cubic footage in the same footprint.
Lighting inside seems minor until you’re digging for leftovers at night. LED interior lights are standard on quality models and draw negligible power. Some units include motion sensors that activate when you open the door.
Best Locations and Rooms for Low Boy Refrigerator Installation
Kitchen islands are prime real estate. A low boy on the back side of an island facing the living room keeps drinks and snacks accessible without guests wandering into the cooking zone. Make sure your island is at least 42 inches deep to accommodate a 24-inch-depth refrigerator plus standard cabinetry (12 inches) without the unit protruding.
Home bars and entertainment spaces practically beg for under-counter refrigeration. Install one below your bar counter for mixers, garnishes, and beer. Pair it with an ice maker if you’re serious about hosting. Models tested by Good Housekeeping often include features tailored for bar use, like adjustable temperature zones for wine.
Outdoor kitchens need weatherproof or weather-resistant units. Standard low boy refrigerators aren’t rated for outdoor use, look for models with stainless-steel exteriors and sealed electrical components rated for outdoor installation. Even then, install under a covered patio or pavilion to protect from direct rain and sun. UV exposure degrades plastic components and insulation over time.
Home offices or studios benefit from nearby cold storage, especially if you’re working long hours. A low boy under your desk or credenza keeps lunch fresh without trips to the main kitchen. Just verify noise levels, compressor hum that’s fine in a kitchen might drive you crazy in a quiet workspace.
Guest suites or in-law apartments gain independence with a low boy. Pair it with a microwave and mini-cooktop, and you’ve got a functional kitchenette. Check local codes: some jurisdictions classify this as a secondary dwelling unit requiring permits or inspections.
Garages and workshops are popular spots, but temperature extremes matter. Most refrigerators are rated for ambient temps between 55–110°F. If your garage drops below 50°F in winter or exceeds 110°F in summer, the compressor will struggle or fail. Garage-ready models include heaters or reinforced compressors to handle wider temp swings.
DIY Installation Tips: How to Install Your Low Boy Refrigerator
Installing a low boy refrigerator is straightforward if you respect clearances and electrical requirements. This is a cosmetic project, not structural work, so no permits are typically required unless you’re adding a new circuit.
1. Measure the space twice. Low boy refrigerators need front ventilation clearance, usually 1–2 inches above the unit for airflow through the toe kick. Side and rear clearances vary: front-venting models need zero side clearance, but leave at least 1 inch in back for power cords and water lines (if applicable). Check the manufacturer’s spec sheet.
2. Verify electrical supply. Most low boys run on 115V/15A circuits. If you’re installing in a kitchen, plug into an existing outlet. Do NOT use an extension cord, undersized wire will overheat. If no outlet exists nearby, hire an electrician to install a dedicated receptacle. This typically costs $150–$300 and ensures compliance with NEC Article 210 for kitchen circuits.
3. Level the unit before sliding it in. Use a 4-foot level on top of the refrigerator. Adjust the front leveling legs (usually screw-type) until the bubble centers. A level fridge seals better and prevents door-swing issues. Some models include rear rollers for easy positioning, lock them once the unit is level.
4. Test door swing and clearance. Open the door fully to ensure it doesn’t hit adjacent cabinets or appliances. Reversible door hinges let you swap the swing direction, handy if the factory config doesn’t work. This usually requires a screwdriver and 10 minutes: the manual will have step-by-step instructions.
5. Secure built-in models with brackets. Panel-ready or built-in low boys often include mounting brackets that screw into adjacent cabinetry or countertop supports. Use these, they prevent tipping if someone leans on the open door and stabilize the unit during transport (if you move later).
6. Connect water lines if applicable. Some low boy fridges include ice makers or water dispensers requiring a 1/4-inch OD water line. Run it from the nearest cold-water supply (often under the sink). Use a saddle valve or dedicated shut-off valve: compression fittings are DIY-friendly. If you’re uncomfortable with plumbing, hire a plumber, water damage from a bad connection will cost more than the service call.
7. Allow the unit to settle before powering on. If the refrigerator was transported horizontally or tilted, let it stand upright for 4–6 hours before plugging in. This lets compressor oil drain back into the reservoir. Skipping this can damage the compressor.
8. Load gradually and monitor temps. Don’t cram it full on day one. Add items over 24–48 hours and check that the interior reaches 35–38°F using a standalone fridge thermometer (don’t trust the built-in display until you verify). If temps fluctuate or the compressor runs constantly, check door seals and clearances.
Safety note: Wear gloves when handling stainless or sharp-edged metal panels. If you’re cutting cabinet openings, use safety goggles and a dust mask, plywood and MDF dust are nasty.
If the installation involves modifying cabinetry, cutting countertops, or running new electrical circuits, factor in those skills. A circular saw and drill handle most cabinet work, but a smart home upgrade for connected appliances might need network configuration.